DSLR Workshop – Going from Woe to Go with DSLR Photography
The workshops and courses that show you how to use your DSLR effectively are proving to be very popular!
Last week, Greg Perry and I conducted the first “Maximising your DSLR” photography workshop for Perth photographers this year. It didn’t take long for this course to fill after we announced it; so much so that we may have to organise another DSLR workshop in the middle of the year if interest levels persist.
This day-long workshop is designed for those who have taken the leap from compact camera photography to Digital SLR photography. The prospect of going from a point-and-shoot medium to one where you suddenly have so much more control over each and every element of picture taking can sometimes confuse the average entry-level photographer!
 Greg shows how to use exposure compensation when dealing with high contrast scenes
The trick lies in breaking down the DSLR photography process into manageable chunks. We start at the very beginning — with using the diopter to make sure that the focusing screen in your viewfinder is clear. It came as quite a surprise that a few workshop participants were completely unaware of the diopter. Next, we looked at auto-focusing options — Greg recommends the use of the centre focus point: that’s where the lens if often at its sharpest and you will be assured that if you use the centre focus point, the image at the point of focus will be absolutely tack sharp.
The workshop covers a wide gamut of DSLR controls and functions and how you can use these to take better photographs. My suggestions for the Top 5 DSLR controls to master are:
- Metering modes – learn what each mode does (evaluative metering, centre-weighted metering, spot metering).
- Auto-exposure lock – a very hand method to lock your exposure, recompose and then take the shot.
- Exposure compensation – work out quickly when and by how much you need to dial up or dial down the exposure.
- Single vs continuous focus – they each have their uses; if you like taking action shots, then learn how to use continuous focus.
- Read your histogram – it’s a good, quick way of gauging the exposure in your image (don’t trust what you see in the LCD preview as ambient light around you can influence the brightness of the image on the LCD).
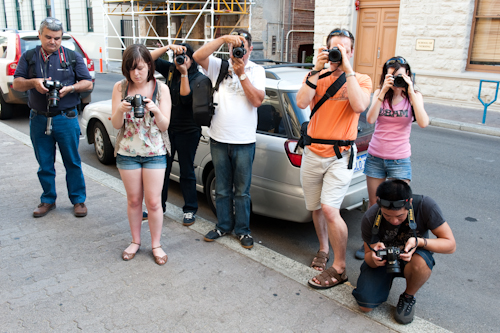
We included a guided photowalk in Fremantle as part of this course — it was important that participants be able to apply what they have learned to real world photography. The walk took us along High Street to the West End of Fremantle, where yours truly took a turn at “modelling” for the participants (thankfully, I didn’t break any lenses with my attempt at providing a human model for workshop participants! 🙂 ).
 The photographs were shooting me, so I shot back!
For those participants with speedlights (external flashes), there was opportunity to learn more about using the speedlight in outdoor portraiture work. Greg suggests dialing down the flash compensation to -2/3 exposure (or -0.7) so that the flash subtly fills in shadows, while allowing natural light to light your subject.
Stay tuned for news about a future “Maximising your DSLR” workshop!

No Comments