5 tips to better DSLR photography
We’ve just wrapped up our last Maximising your DSLR workshop for our summer photography programme and I thought I’d share some of the key points raised in this workshop.
Maximising your DSLR is a one-day photography course aimed at photographers new to shooting with a digital SLR. Let’s face it — the reason you bought a DSLR because you realised that your compact digital camera had limitations, and using a DSLR will not only give you better image quality, but greater control over how your images turn out.
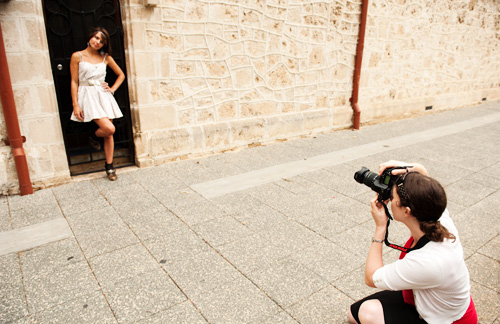
Our workshop focuses on getting you off the “Auto” mode on your DSLR (and this includes the Auto “Scene” modes such as the Portrait, Landscape, Macro, Action modes on your dial), and gets you using your DSLR more creatively, so that you’re making a conscious choice about how you shoot. We also feature a model in the street shoot segment of this workshop. Having Tamarin pose for us meant that workshop participants could practise what they had learned about controlling their DSLR.
Here are our top five tips for DSLR photography, taken from our Maximising your DSLR workshop:
1. SELECTIVE FOCUS
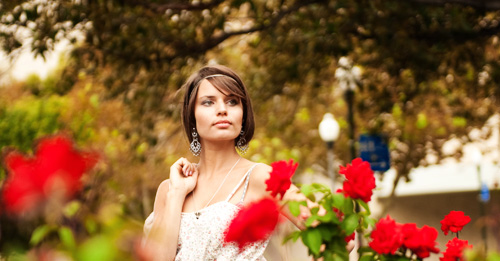
Many beginning photographers leave their DSLR on multi-focus, letting the camera decide the point of focus from the bevy of focus points available (often more than 50 potential focus points in the more advanced DSLRs). However, the camera doesn’t know that you’d like the focus to be on the person standing behind the rose bush and not the rose bush itself! Take your DSLR off multi-focus, and set it to a single focus point (check your DSLR manual to find out how you can set your focus point). We recommend setting a central focus point (the point at the centre of your viewfinder) as it’s the brightest and often sharpest point in your lens. To do this, your DSLR must be set to its P, Av (or A), Tv (or S) or M modes (you cannot select a single focus point if you’re shooting on an automatic mode).
In this shot, we are able to selectively focus on our model, Tamarin, even though she is behind several rose bushes. If the DSLR had been left at multi-focus, then there is a chance it would choose to focus on the roses instead of Tamarin:

2. FOCUS LOCK AND RECOMPOSE
Now that you’ve set your DSLR to a single focus point, you can place the point over the subject you want in focus and take the picture. Too easy! But wait – there’s more! You can now lock the focus on your subject by pressing the shutter button half way down (not fully down) and wait for focus confirmation (your camera may beep, or a little circle will appear in the corner of your viewfinder). Once focus is confirmed, and while maintaining the half-press on the shutter button, you can now pan the camera left/right or up/down to relocate your subject within the frame. Once you have located your subject within the frame, press the shutter button all the way through to take the picture. Your subject will still remain sharp in the photo as you have locked focus on the subject prior to recomposing its position in the frame.
In this example, we focus-locked on Tamarin, and then recomposed to set her at the left-hand side of the frame:

3. CONTROL DEPTH OF FIELD WITH APERTURE
Aperture describes the window in your lens that lets light into your camera. When you set your camera to Av (or A), you’re setting it on Aperture Priority – which means you can control the size of this window using the command dial. The size of the aperture is represented by a number, called an f-number. The lower the f-number, the larger the window.
The size of the aperture window controls the depth of field in your photograph. Depth of field refers to the zone of sharpness in your image. A shallow depth of field means that objects to the front and back of the point of focus loose sharpness and appear soft. Great for portraits where you would like to separate the subject from the background. A deep depth of field means that objects to the front or back of the point of focus retain their sharpness, which is great for landscape photographs.
Set your aperture to a small f-number to obtain a shallow depth of field (try f3.5, f4.0 or f5.6). Set it to a larger f-number if you need deep depth of field (try f8.0, f10 or f11). Here’s an example:

Compare the depth of field: a shallow depth of field at f4.0 means the background leaves appear softer. A deeper depth of field at 4.11 shows clearer background leaves.
And here’s how a shallow depth of field is used to separate our model, Tamarin, from a fairly busy background (building facades):

4. FREEZE OR BLUR MOTION BY CONTROLLING SHUTTER SPEED
Shutter speed refers to the duration the camera shutter remains open to expose the camera’s digital sensor to light entering the camera.
When you set your DSLR to shutter priority mode (Tv or S), you can control the shutter speed by using the command dial. Shutter speed is represented in fractions of a second, so 500 is actually 1/500th of a second; 30 is 1/30th of a second. If shutter speed is represented with a set of quotation marks, for example 2″, then we’re talking about full seconds here; in this case, 2 whole seconds!
When you shoot at fast shutter speeds, you can freeze motion. Try photographing someone jumping in the air at 1/250 or 1/500 of a second, and see them frozen in mid-air if you happen to click the shutter while they’re in mid-jump. Shooting at slower shutter speeds creates motion blur — it’s the reason why so many photos taken in low light look blurry, because the camera has to leave the shutter open for a long time to allow enough light to land on the sensor. You can use slow shutter speeds to create a sense of movement – for example, photographing running water at slow shutter speeds will turn the water smooth and silky.

5. ISO AND LOW LIGHT PHOTOGRAPHY
If you’re shooting in low light and your shots look blurry, chances are that you’ll need to increase the ISO. ISO refers to the sensitivity of the digital sensor in your DSLR to light. A low ISO makes the sensor less sensitive to light and is ideal for shooting in brightly lit situations (eg. in broad daylight). A high ISO makes the sensor super-sensitive to light, so you don’t need much light in order to create an exposure. There is a trade-off, however. Pictures taken with high ISOs tend to look noisy and slightly degraded, because the digital sensor begins to replace actual image detail with pixels.
To control ISO, look for the ISO button on your camera. Press this and turn the command dial. In most DSLRs, you should be able to set the ISO between 200 and 1600. Some DSLRs allow you to set the ISO to as low as 50, and as high as 6400 or highter.
Remember that the next time you need to shoot and there isn’t enough light, dial your ISO up. It helps also to make sure you have your aperture open as wide as possible (as low an f-number as possible) to let as much light into the camera.
If you’re new to DSLR photography and are keen to learn how to take better control of your camera, book yourself in for one of our Maximising your DSLR lessons.

No Comments