Shutter blending: the long (exposure) and the short (exposure) of it.
Shutter blending isn’t new in photography (digital or otherwise) but I’m often surprised that not many photographers make use of it.
Most of us would already be familiar with exposure blending: taking bracketed exposures of the same composition and then blending them to ensure that the final image consists of areas where detail is retained in the brights, mid-tones and darks. Shutter blending is pretty much the same, but instead of blending different exposures, you’re blending different parts of the composition that are taken with different shutter speeds.
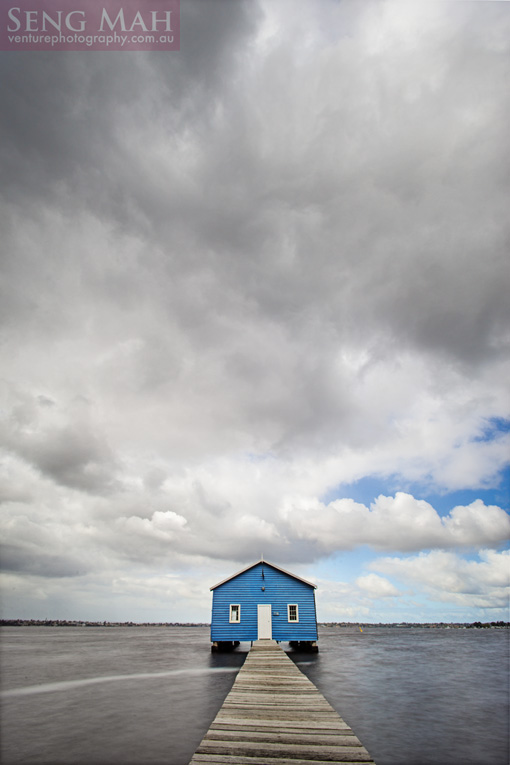
Here’s an image of the most photographed boat shed in Perth, created using shutter blending.

On face value, you might think, “Ok, so it’s a nice photo of the blue boatshed. What’s so special about it?”. Look closer and you’ll see that:
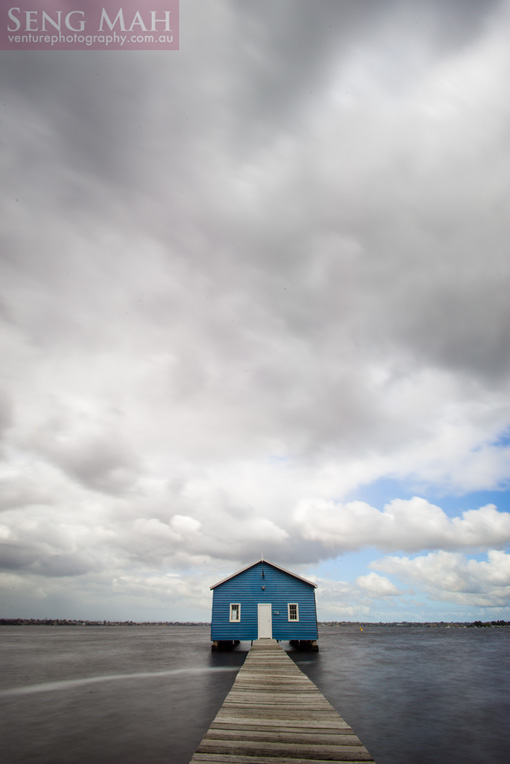
- The river has been photographed using a long exposure (8 seconds in this case) and hence looks quite cloudy/soft.
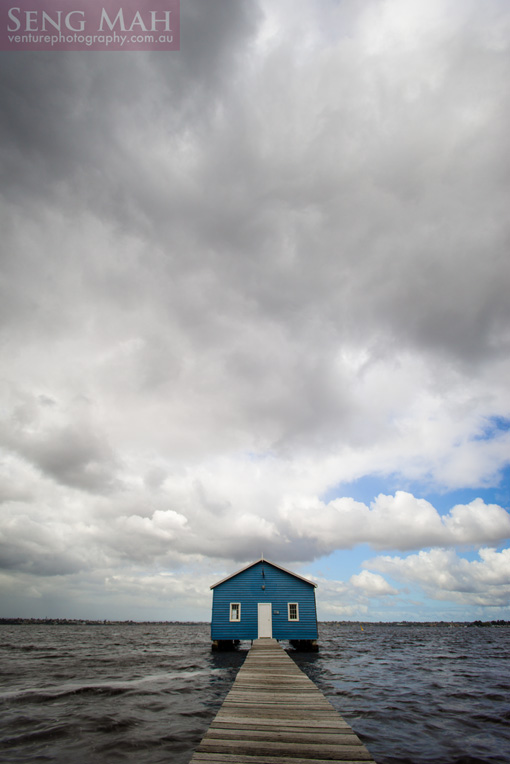
- The clouds in the sky have been photographed using a short exposure (about 1/4 second) and hence look nicely defined (ie. not streaky or smudge like).
So, how is it done?
Shutter blending works best when you have different parts of the same scene that are moving at different speeds. Your most typical example is a scene that incorporates water (eg. a lake, sea, river, waterfall) and clouds in the sky. The moving water would look awesome if taken in long exposure (turning it smooth or misty), but this might require a very long exposure (say, in excess of 10 seconds). A 10-second long exposure, however, would cause the nice clouds in the sky to streak and look like pale smudges – formless and uninteresting.
Shooting for shutter blending means that you take two pictures of the same scene which vary in shutter speed, but you need to ensure that your Aperture and ISO values compensate for the change in shutter speed to retain the same exposure across both images.
The easiest way to do this is to shoot in Shutter Priority and let your camera adjust the Aperture value to compensate for the change you make to the shutter speed. To blur moving water, you’ll need a shutter speed of anywhere from 1/4 second to 15 seconds — depending on how quickly the water is moving; a shorter shutter speed for waterfalls and cascades (eg. 2 seconds), longer for streams and rivers (10 seconds or more).
If you’re more confident in shooting in Manual Exposure, you then have the luxury of being quite choosy about how you want to expose the scene. You then shoot two compositions of the same scene for that exposure value, but vary the shutter speed (and changing the Aperture and/or ISO to compensate).
This frame, of the blue boat shed, is an 8 second long exposure. The water looks nice and soft, but the clouds in the sky are unattractive smudges:

The next frame is a 1/4 second exposure — a lot shorter. The water now looks more defined (not as nice and soft), but we now have form and definition in the clouds:

Needless to say, you need a tripod to ensure that the camera is steady and the composition doesn’t change between both frames.
Once you have both frames, go into an image editing application that allows you to stack or layer images, such as Photoshop. Open both images as layers. You may need to align the layers (either manually or automatically, using your software’s functions) to make sure that they perfectly align.
There are a number of ways to do the next step:
- If you’re familiar with using layer masks, you then mask out parts of one layer, allowing the detail in the other layer to show. In the example above, I put the short exposure layer above the long exposure layer, and then masked out the river, allowing the long exposure river in the bottom layer to show.
- If you’re not familiar with using layer masks, then you can use the Eraser tool to erase parts of the top layer to show the bottom layer. In my example, where the short exposure layer is above the long exposure layer, I would use the eraser tool to erase the river from the top layer, revealing the long exposure river of the bottom layer. But I’d recommend learning to use layer masks as this approach is non-destructive to your image.
Once you have blended the two exposures, give it a bit of post-production love and …

… there you have it, a shutter blended image!
If you’ve done shutter blends before, or if this post has inspired you to give it a go, drop a link to your shutter blended image in the comments below. I’d love to see it!
If you’d like to learn more about controlling shutter speeds to create long and short exposures, you can learn how and more at our Getting Started in DSLR Photography workshops. Or if you’re not a beginner, you may find something new and exciting to learn in our Advanced DSLR Photography workshops.

No Comments