Lightroom Tip: Retaining Camera Profiles on Import
Here is a tip for those who shoot in RAW image format and who would like Lightroom to retain the picture’s profile (also called Picture Style or Image Style, depending on camera you use) when it imports the picture into Lightroom Classic (note: this features is available in Lightroom Classic 9.2 and above — effective February 2020).
Your digital camera usually comes with a set of preset profiles that affects the look of the image taken. Typical profiles include presets such as “Landscape”, “Portrait”, “Monochrome”, “Vibrant”, “Faithful”, “Standard” and so on. Some cameras have more extensive profiles: Fujifilm cameras, for instance, have profiles based on film simulation, while others allow you to create Sepia toned images. A profile is basically what your picture would look like if it were processed by your camera using the parameters of the preset.
These profiles are usually visible in the image on two instances: when you preview the image on your camera and in any JPEG files created when you took the picture.
If you shoot in RAW, however, these profiles are usually ignored (as the RAW file is essentially your unprocessed image). But… Lightroom Classic now lets you apply your camera profiles to your RAW image when it imports the images into your Lightroom Catalogue.
This means that all your images, on import, will look as they did when you previewed them on your camera’s LCD. Black and white images will display as black and white; vivid images will have amplified colour and contrast, and so on… Because you shot in Raw, you can always go back into Lightroom and change the settings of your image, but it’s very nifty being able to see what your camera has caught when you import and display your images in Lightroom.
Here is how it’s done:
- Before you import the images into Lightroom Classic, open Lightroom Classic and, depending on whether you use a Mac or Windows, do the following: Choose EDIT > PREFERENCES (PC/Windows) or LIGHTROOM > PREFERENCES (Mac).
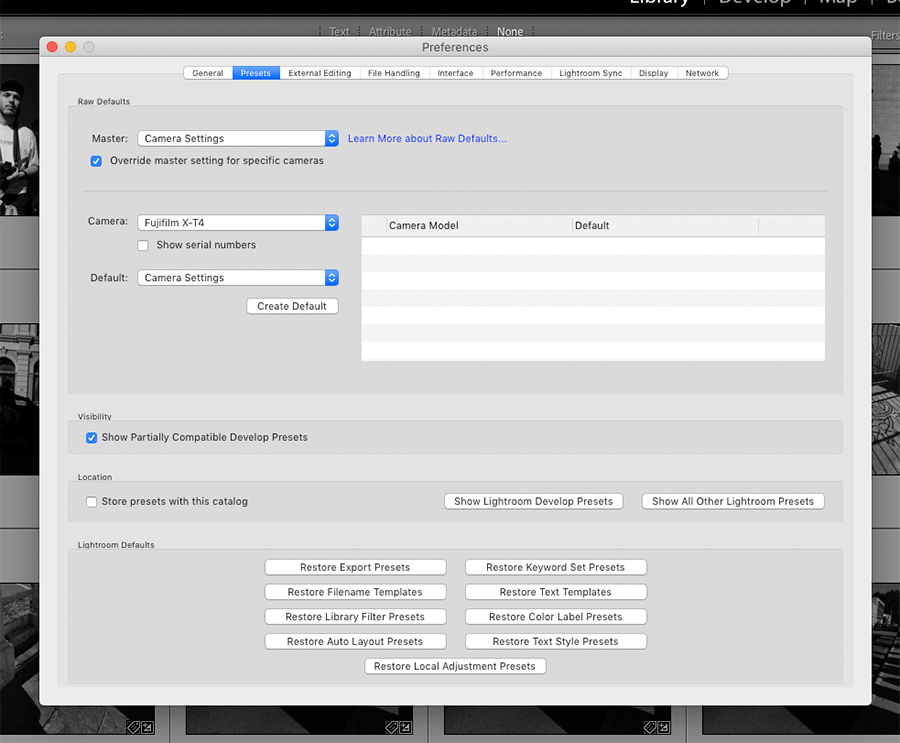
- In the PREFERENCES dialogue box that pops up, select the PRESETS tab. You’ll see the following options available:

- Make sure the “Master:” drop down box has “Camera Settings” selected, and that the checkbox for “Override master setting for specific cameras” is ticked. (You can also read more detailed instructions from Adobe here.)
- That’s it!
Importing your RAW images into Lightroom with the profiles applied as a preset makes things a lot easier if you’d like to use the profiled images as your baseline for further work in Lightroom.
If you import your images to Lightroom without already having applied the profiles on import, you still apply the profile to each image in Lightroom as you work on it. For detailed instructions on how to do this per image in the Lightroom Develop Module, read this article from Creative Pro: Using Lightroom Profiles.

No Comments